If you've been trying to host a website but don't have a credit card that supports international payments , you're not alone. This is a very common problem in countries like Bangladesh, India, and many other parts of the world. The good news? You can host a fully functional Node.js website on a VPS and pay using cryptocurrency. No credit card. No PayPal. Just crypto.
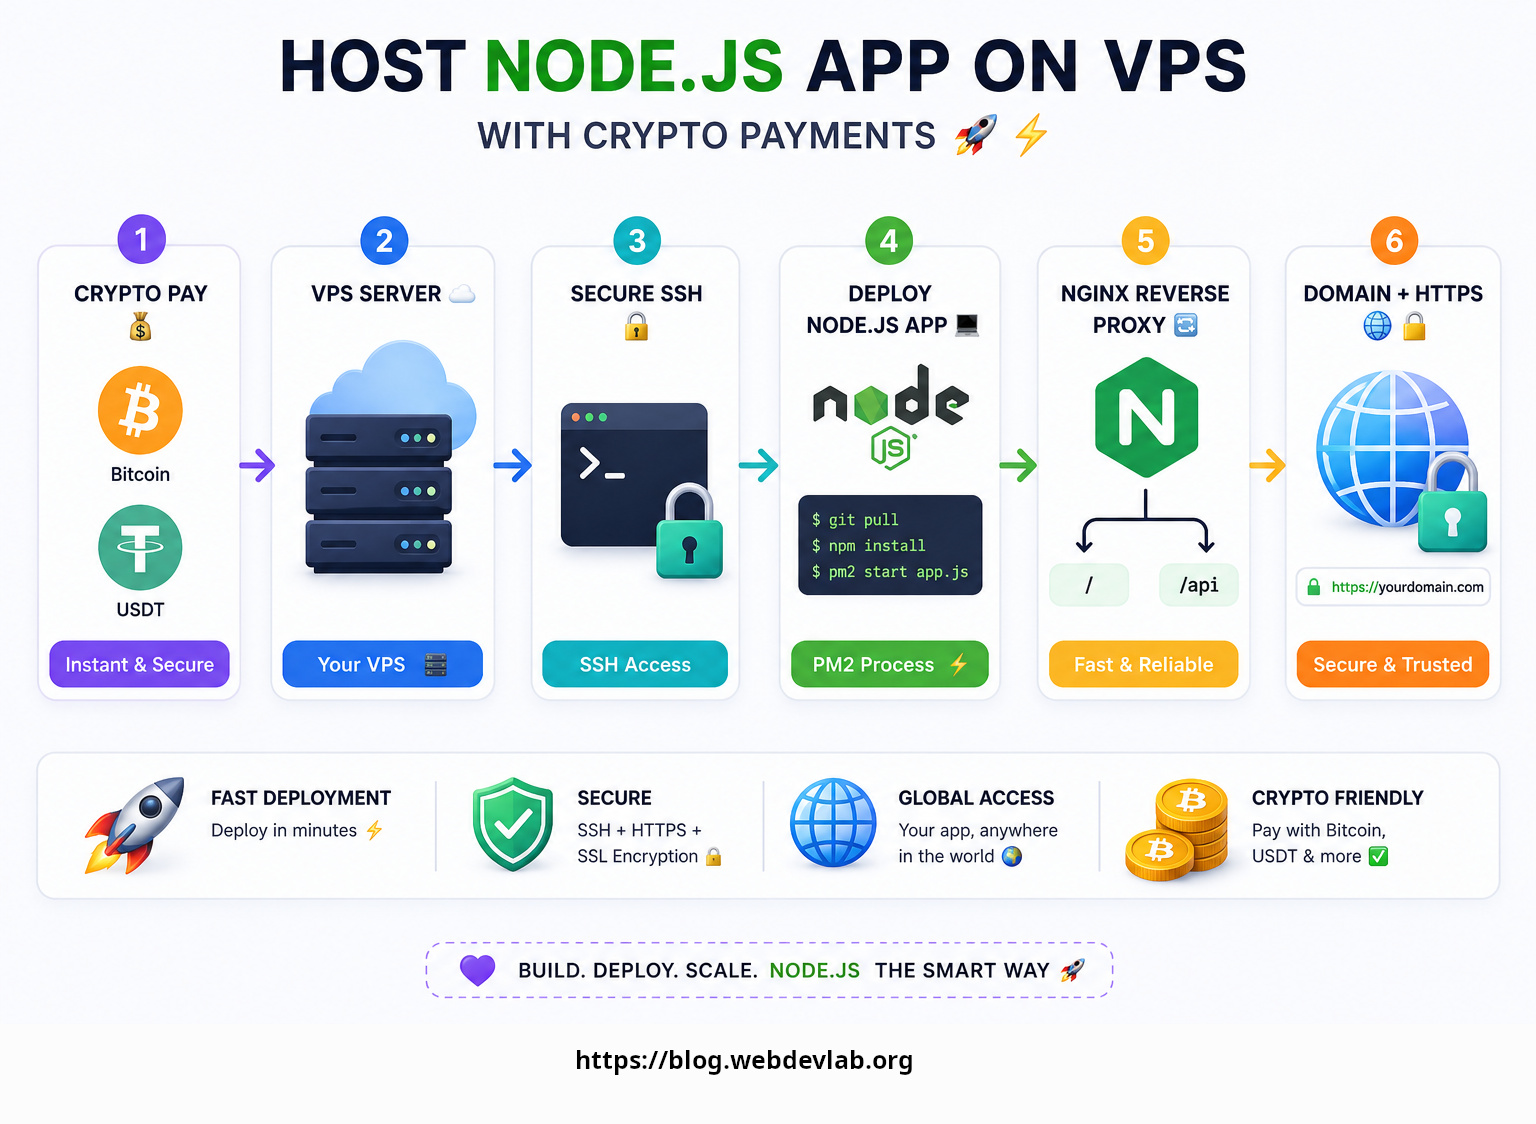
In this tutorial, I'll walk you through everything from buying a VPS with crypto, setting up Ubuntu, configuring Nginx as a reverse proxy, securing your server with a firewall and SSH keys, and finally adding a free SSL certificate, all step by step.
What You'll Need Before We Start
A computer running Linux, macOS, or Windows (with Git Bash or WSL)
A basic understanding of the terminal (don't worry, I'll explain every command)
A crypto wallet or exchange account (like Binance, Coinbase, or KuCoin) with some USDT or other supported crypto
A registered domain name (we'll use Cloudflare DNS in this guide)
Step 1: Choose the Right VPS Provider
There are several VPS providers that accept crypto: Vultr, Hostinger, BitLaunch, and others. After trying a few of them, I found UltraHost to be the most affordable option that supports multiple cryptocurrencies.
Go ahead and sign up here: https://ultahost.com/#webdevlab
Fill in your details, create an account, and verify your email. You might see a "something went wrong" message after signing up, don't panic, just reload the page. It happens sometimes.
Once you're logged in, click on your profile and switch to the main dashboard.
Step 2: Purchase a VPS Plan
From the Services menu, pick a plan that fits your project size. For a small project like a blog or a small e-commerce site, the VPS Business package is a solid choice. It gives you:
2 CPU cores
2 GB RAM
50 GB NVMe SSD
If you buy it for 2 years, it comes down to around $8.50/month. If you're just starting out and want to commit monthly, it'll be around $10.50/month, which is still very reasonable.
Pick Your Server Location Wisely
This is important. Always pick the server location that's closest to your target audience, not closest to you. Why? Because the physical distance between the server and your visitors directly affects how fast your website loads for them.
For example, if most of your visitors are from Bangladesh and India, a server in Singapore is a great choice, it's geographically close and usually comes without extra charges compared to Mumbai.
Choose Your Operating System
When selecting the OS, go with Ubuntu (select "Plain OS" and pick the latest LTS version). Here's why Ubuntu is the go-to choice for hosting:
It's free and open-source
It has excellent community support
It's stable, secure, and widely used for servers
You can skip the extra disk space and additional IPv4 options, you'll get one IP address by default, and that's all you need.
For SSL, select none , we'll use Let's Encrypt later, which is completely free and just as good as paid certificates.
Click Continue, review your order, and enter the promo code webdevlab (all lowercase, no spaces) in the promotion field to get a discount.
Step 3: Pay with Crypto
This is the part that makes this method so powerful, especially if you don't have a card for international payments.
On the payment screen, select "Bitcoin | Ethereum | 8+ Cryptocurrencies" and click Checkout.
If you get a login error, just log out and log back in, it's a minor bug.
You'll be redirected to a payment page powered by Cryptomus. You'll have about 11 minutes to complete the payment, so don't close the tab.
Selecting Your Crypto Network, This Part Is Critical
Choose your currency (I recommend USDT since 1 USDT ≈ 1 USD, so it's easy to calculate).
Now here's the most important thing: choose the right network. If you select the wrong network, your money could be lost permanently. Each blockchain network charges a small fee (called a gas fee). The cheapest and fastest option is TRON (TRC-20), so I recommend going with that.
Whatever network you select here, you must send from the same network on your exchange. Keep the Cryptomus page open.
Sending USDT from Binance
Open Binance (or any exchange you use - Coinbase, KuCoin, Bybit all work).
If you don't have USDT, you can buy it using:
A debit/credit card
P2P trading: which accepts local payment methods like bKash in Bangladesh, bank transfers, and more
Once you have USDT in your wallet, go to Assets → Send/Withdraw → Withdraw Crypto.
Paste the wallet address from Cryptomus
Select TRON as the network (must match what you selected on Cryptomus)
Enter the exact amount shown (e.g., $10.83). Make sure the received amount matches, you may need to add a tiny bit extra to cover the gas fee.
Double-check everything and hit Withdraw. You'll get a confirmation email from Binance, and within a minute or two, the Cryptomus screen will update and show "Paid".
Step 4: Connect to Your VPS Server
Go back to UltraHost's dashboard, navigate to Services, and find your purchased server. You'll see a Primary IP address — copy it, you'll need it every time you connect.
How to SSH Into Your Server
On Linux or macOS:
ssh root@your_ip_addressType yes when prompted, then enter the password from your UltraHost dashboard.
On Windows: Use Git Bash, WSL, or PuTTY to run the same command.
Once you're in, you'll see the terminal prompt change — that means you're now inside your remote server. Pretty cool, right?
Step 5: Update the Server
Before doing anything else, always update your system. This ensures you have the latest security patches and software versions.
apt update
apt upgrade
apt updaterefreshes the list of available packagesapt upgradeactually installs the newer versions
This might take a few minutes. Let it finish.
Step 6: Create a New User (Don't Stay as Root)
Working as the root user is risky. Root has unrestricted access to everything, and a single mistake can break your entire server. So let's create a regular user and give it sudo (admin) privileges.
adduser shayonEnter a strong password, fill in the full name if you want, and press Enter to skip the rest.
Now add this user to the sudo group so they can run admin commands when needed:
usermod -aG sudo shayonSwitch to the new user:
su - shayonStep 7: Set Up SSH Key Authentication
Using a password to log in is convenient but less secure. SSH keys are much stronger — they're practically impossible to brute-force. Let's set that up.
First, create the .ssh directory and the authorized_keys file:
mkdir ~/.ssh
nano ~/.ssh/authorized_keys
On your local machine (your laptop or PC), generate an SSH key pair:
ssh-keygen -t ed25519 -C "your_email@example.com"This creates two files:
~/.ssh/id_ed25519- your private key (never share this)~/.ssh/id_ed25519.pub-your public key (this is what you'll copy to the server)
To view your public key:
cat ~/.ssh/id_ed25519.pubCopy the entire output, go back to your server terminal (inside nano), paste the key into the authorized_keys file, then save with Ctrl+S and exit with Ctrl+X.
Now fix the file permissions - SSH is very strict about this:
sudo chown -R shayon:shayon ~/.ssh
sudo chmod 700 ~/.ssh
sudo chmod 600 ~/.ssh/authorized_keyschown- changes the file owner to theshayonuserchmod 700- only the owner can read/write/execute the.sshfolderchmod 600- only the owner can read/write theauthorized_keysfile
Exit the server and reconnect with the new user:
exit
ssh shayon@your_ip_address
If it connects without asking for a password, SSH keys are working correctly.
Step 8: Disable Root Login and Password Authentication
Now that SSH keys are set up, let's tighten security even further.
sudo nano /etc/ssh/sshd_configUse Ctrl+W to search for PermitRootLogin and set it to:
PermitRootLogin noThen search for PasswordAuthentication and set it to:
PasswordAuthentication noThis means no one can log in as root, and no one can use a password to log in, only SSH keys work. Save and exit, then restart SSH:
sudo systemctl restart sshStep 9: Set Up the Firewall (UFW)
A firewall controls which traffic is allowed in and out of your server. Without one, your server is exposed to the entire internet — which is a very bad idea.
Ubuntu comes with UFW (Uncomplicated Firewall) pre-installed. Let's configure it:
sudo ufw enable
sudo ufw allow ssh
sudo ufw default deny incoming
sudo ufw default allow outgoing
sudo ufw allow OpenSSH
sudo ufw allow 22/tcp
Here's what each command does:
ufw enable- turns on the firewall and makes it start automatically on bootallow ssh/allow OpenSSH/allow 22/tcp- allows SSH connections so you don't lock yourself outdefault deny incoming- blocks all incoming traffic by defaultdefault allow outgoing- allows all outgoing traffic
To check your firewall rules:
sudo ufw statusStep 10: Install Nginx
Nginx is a high-performance web server. We'll use it as a reverse proxy - meaning Nginx will sit in front of our Node.js app, receive all incoming HTTP requests, and forward them to the Node.js server running on port 3000.
Why not just expose Node.js directly? Because Nginx handles things like SSL termination, load balancing, and serving static files much more efficiently.
sudo apt update
sudo apt install nginx -y
Enable and start Nginx:
sudo systemctl enable nginx
sudo systemctl start nginx
Now open a browser and navigate to http://your_ip_address. You should see the Nginx welcome page. That confirms Nginx is running correctly.
Step 11: Install Node.js Using NVM
NVM (Node Version Manager) lets you install and switch between different versions of Node.js easily. It's the recommended way to install Node.js on a server.
Download and install NVM:
curl -o- https://raw.githubusercontent.com/nvm-sh/nvm/v0.40.5/install.sh | bashLoad NVM into your current shell session:
\. "$HOME/.nvm/nvm.sh"Install the latest LTS version of Node.js:
nvm install 24Verify the installation:
node -v
npm -v
If both commands return version numbers, Node.js is installed successfully.
Step 12: Install Git
Git is used for version control and for pulling your project code from GitHub or other repositories.
sudo apt update
sudo apt install git
git --version
Step 13: Create and Run a Simple Node.js Server
Let's create a basic Node.js HTTP server to test everything is working.
mkdir node-app
cd node-app
nano server.mjs
Paste the following code:
// server.mjs
import { createServer } from 'node:http';

const server = createServer((req, res) => {
  res.writeHead(200, { 'Content-Type': 'text/plain' });
  res.end('Hello World!\n');
});

// Starts a simple HTTP server on port 3000
server.listen(3000, '127.0.0.1', () => {
  console.log('Listening on 127.0.0.1:3000');
});
Save with Ctrl+S and exit with Ctrl+X. Now run it:
node server.mjsYou should see: Listening on 127.0.0.1:3000
The server is running locally — but it's not yet accessible from the internet. That's where Nginx comes in.
Step 14: Configure Nginx as a Reverse Proxy
Open a new terminal session and SSH into your server again (keep the Node.js server running in the first session).
Create a new Nginx configuration file for your app:
sudo nano /etc/nginx/sites-available/my-node-appPaste the following configuration (replace admin.uncharted.webdevlab.org with your own domain):
nginx
server {
    listen 80;
    server_name admin.uncharted.webdevlab.org;

    location / {
        proxy_pass http://127.0.0.1:3000;
        proxy_http_version 1.1;
        proxy_set_header Host $host;
        proxy_set_header X-Real-IP $remote_addr;
        proxy_set_header X-Forwarded-For $proxy_add_x_forwarded_for;
    }
}
This tells Nginx: "For any request coming in on port 80 for this domain, forward it to port 3000 on localhost (where Node.js is running)."
Now enable the config by creating a symbolic link:
sudo ln -s /etc/nginx/sites-available/my-node-app /etc/nginx/sites-enabledRemove the default Nginx config (it can conflict):
sudo rm /etc/nginx/sites-available/default
sudo rm /etc/nginx/sites-enabled/default
Test the Nginx configuration for syntax errors:
sudo nginx -tIf it says syntax is ok and test is successful, reload Nginx:
sudo systemctl reload nginxStep 15: Point Your Domain to the Server (Cloudflare DNS)
Log in to your domain registrar or DNS provider. This example uses Cloudflare, but the process is similar for others.
Go to your domain's DNS settings and create a new A Record:
Type: A
Name:
admin.uncharted(or whatever subdomain you want)IPv4 address: Your VPS IP address
Proxy: Turn it off (use DNS only mode)
Save the record. DNS changes can take a few minutes to propagate.
Step 16: Add a Free SSL Certificate with Let's Encrypt
SSL (HTTPS) is no longer optional — it protects your users' data and is required for modern browsers to trust your site. Let's Encrypt provides free SSL certificates that are just as valid as paid ones.
Install Certbot (the Let's Encrypt client):
sudo apt install certbot python3-certbot-nginx -yRequest and install the certificate for your domain:
sudo certbot --nginx -d admin.uncharted.webdevlab.orgFollow the prompts:
Enter a valid email address
Type
Yto agree to the termsType
Nto skip the marketing emails (optional)
If everything goes well, you'll see: "Congratulations! You have successfully enabled HTTPS."
Certbot will automatically modify your Nginx config to handle HTTPS and set up auto-renewal, so you don't have to manually renew the certificate every 90 days.
Step 17: Run Your Node.js Server and Test
Go back to your Node.js terminal session and run the server:
node server.mjsNow open a browser and go to your domain (e.g., https://admin.uncharted.webdevlab.org).
You should see: Hello World!
And it's running over HTTPS. Your Node.js website is now live on the internet, hosted on a VPS you paid for with crypto — no credit card needed.
Final Thoughts
This setup is a great starting point for any small to medium project. Here's a quick recap of what we did:
Bought a VPS on UltraHost using USDT via Cryptomus
Set up Ubuntu and secured the server with a new user and SSH keys
Configured UFW firewall rules
Installed Nginx as a reverse proxy
Installed Node.js using NVM
Deployed a simple Node.js app
Pointed a domain using Cloudflare DNS
Added free HTTPS using Let's Encrypt
For a production project, you'd also want to use a process manager like PM2 to keep your Node.js server running in the background and restart it automatically on crashes or reboots. That's a topic for another tutorial.
If you get stuck at any point, feel free to re-read the relevant section carefully — most issues come from small typos in commands or selecting the wrong network during crypto payment.
Good luck with your project!