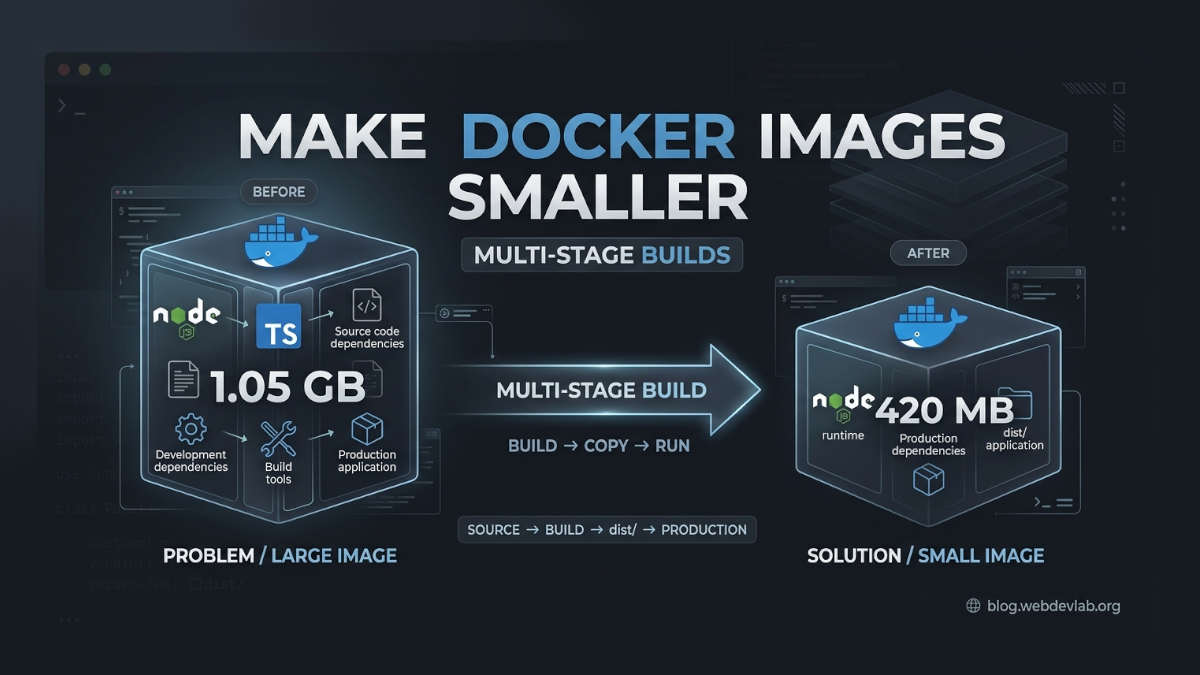
Have you ever built a Docker image and then noticed that it is much larger than you expected?
Maybe your application is small, but the Docker image is hundreds of megabytes.
Why?
One common reason is that your Docker image contains things that are only needed while building the application, not while running it.
For example, a Node.js application may need TypeScript, development dependencies, source code, npm, and build tools during the build process.
But once the application is built, do you really need all of those things?
Usually, no.
This is where Docker multi-stage builds become useful.
In this tutorial, I will show you the problem first, build a normal Docker image, check its size, and then improve it using a multi-stage Docker build.
I will keep the example simple so you can follow along even if you are just getting started with Docker.
What Is the Problem?
Let's say we have a simple Node.js application.
Our project looks something like this:
my-app/
├── src/
│   └── index.ts
├── package.json
├── package-lock.json
├── tsconfig.json
└── Dockerfile
Our application is written in TypeScript.
Before we can run it, we need to build it:
TypeScript source code
        ↓
    TypeScript compiler
        ↓
   JavaScript files
        ↓
     Run the app
The important thing to understand is that the TypeScript compiler is needed during the build.
It does not necessarily need to be inside the final production environment.
Our First Dockerfile
Let's start with a simple Dockerfile.
FROM node:22

WORKDIR /app

COPY . .

RUN npm install

RUN npm run build

CMD ["node", "dist/index.js"]
This Dockerfile works.
Let's understand what each line does.
Step 1: Choose a Node.js image
FROM node:22This tells Docker:
Start with the Node.js 22 image.
The image already contains Node.js and npm, so we don't have to install them ourselves.
Step 2: Create a working directory
WORKDIR /appThis sets /app as the directory where our application will live.
Think of it as:
"From now on, work inside
/app."
Step 3: Copy the project
COPY . .This copies our project files into the Docker image.
That includes things such as:
src/
package.json
package-lock.json
tsconfig.json
and other files that are inside the build context.
Step 4: Install dependencies
RUN npm installThis installs the packages listed in package.json.
For a TypeScript application, this could include things like:
typescript
@types/node
express
and other packages
Some of these packages may only be needed during development or the build.
Step 5: Build the application
RUN npm run buildThis runs the build command from package.json.
For example:
{
  "scripts": {
    "build": "tsc"
  }
}
The TypeScript compiler converts our TypeScript files into JavaScript.
For example:
src/index.ts
      ↓
dist/index.js
Step 6: Start the application
Finally:
CMD ["node", "dist/index.js"]Docker starts our compiled application using Node.js.
So our basic workflow looks like this:
Source code
    ↓
npm install
    ↓
npm run build
    ↓
dist/
    ↓
node dist/index.js
Everything works.
But there is a problem.
The Docker Image Contains More Than the App Needs
After the image is built, it can contain:
Source code
TypeScript
Development dependencies
Build tools
Build files
Production application
But when the application is running, do we need all of that?
For example, if we already have:
dist/index.jswe don't need to compile the TypeScript again just to run the application.
This gives us an important idea:
The environment used to build an application does not have to be the same environment used to run it.
And that is exactly what multi-stage builds help us do.
Quick Question
Before continuing, think about this:
Question: Which of these is normally needed to build a TypeScript application?
A. TypeScript compiler
B. Build dependencies
C. Source code
D. All of the above
The answer is D.
But do we need all of them to run the already-built JavaScript application?
Usually, no.
That is the key idea behind this tutorial.
What Is a Multi-Stage Docker Build?
A multi-stage Dockerfile has multiple FROM instructions.
For example:
FROM node:22 AS build

# Build the application here

FROM node:22-alpine

# Run the application here
The first stage is responsible for building the application.
The second stage is responsible for running it.
Think about building a house.
During construction, you need:
Hammer
Saw
Ladder
Drill
Building materials
But after the house is finished, you don't put every construction tool inside the house.
The same idea applies here.
BUILD STAGE
Everything needed to build
        ↓
   Finished app
        ↓
PRODUCTION STAGE
Only what is needed to run
Let's Build a Multi-Stage Docker Image
Here is our improved Dockerfile:
# --------------------
# Build stage
# --------------------
FROM node:22 AS build

WORKDIR /app

COPY package*.json ./

RUN npm install

COPY . .

RUN npm run build


# --------------------
# Production stage
# --------------------
FROM node:22-alpine

WORKDIR /app

COPY package*.json ./

RUN npm install --omit=dev

COPY --from=build /app/dist ./dist

CMD ["node", "dist/index.js"]
It may look a little longer than our first Dockerfile.
But there is an important difference.
Let's go through it step by step.
Step 1: Create the Build Stage
FROM node:22 AS buildThe important part here is:
AS buildWe are giving this stage a name:
buildWe can use this name later.
Step 2: Set the Working Directory
WORKDIR /appSame as before.
Our application will live inside /app.
Step 3: Copy Package Files
COPY package*.json ./This copies:
package.json
package-lock.json
into the image.
Then we install the dependencies:
RUN npm installNow the build stage has everything required to build our application.
Step 4: Copy the Source Code
COPY . .Now our source code is available.
For example:
src/
tsconfig.json
package.json
Step 5: Build the Application
RUN npm run buildThis creates our production files.
For example:
/app/dist/index.jsAt this point, our build stage has done its job.
We have the finished application.
Now Create the Production Stage
Here is where the interesting part starts.
FROM node:22-alpineNotice that we start another image.
This is our production stage.
We are not continuing with the previous image.
We are starting fresh.
Why node:22-alpine?
The Alpine Linux based Node image is designed to be smaller than the standard Node image.
So we are already starting with a smaller base image.
But remember:
Using Alpine does not automatically solve every image-size problem.
The bigger idea here is separating the build environment from the production environment.
Step 6: Install Only Production Dependencies
COPY package*.json ./

RUN npm install --omit=dev
The important part is:
--omit=devThis tells npm not to install development dependencies.
So packages that are only needed during development or building can stay out of the production image.
Step 7: Copy Only the Build Result
Now look at this line carefully:
COPY --from=build /app/dist ./distThis is one of the most important lines in the entire Dockerfile.
We are saying:
Take the
distdirectory from thebuildstage and copy it into the production image.
We are not copying the entire build environment.
We only copy the finished application.
Visually:
BUILD STAGE

src/
typescript
dev dependencies
build tools
dist/
   ↓
   ↓ COPY ONLY THIS
   ↓

PRODUCTION STAGE

dist/
production dependencies
Node.js runtime
That is the core idea of a multi-stage build.
Let's Build Both Images
Now let's see what actually happens.
First, build the original image:
docker build -t my-app-old -f Dockerfile.old .Then check its size:
docker images my-app-oldYou might see something similar to:
REPOSITORY   TAG       IMAGE ID       SIZE
my-app-old   latest    7d82c1a9f123   1.05GB
The exact number will be different depending on your application and dependencies.
Now build the multi-stage version:
docker build -t my-app-new -f Dockerfile .Then:
docker images my-app-newFor example:
REPOSITORY   TAG       IMAGE ID       SIZE
my-app-new   latest    9a21c7b4e812   420MB
In this example:
Old image: 1.05 GB
New image: 420 MB
That's a significant reduction.
But don't expect the exact same result in every project.
The amount you save depends on things like:
Base image
Dependencies
Build tools
Source files
Development dependencies
Application architecture
For some applications, the reduction can be dramatic.
For others, it may be much smaller.
Let's See What We Removed
The original image could contain something like:
┌─────────────────────────┐
│       Docker Image      │
├─────────────────────────┤
│ Node.js                 │
│ npm                     │
│ TypeScript              │
│ Dev dependencies        │
│ Source code             │
│ Build tools             │
│ Production app          │
└─────────────────────────┘
Our production image is closer to:
┌─────────────────────────┐
│    Production Image     │
├─────────────────────────┤
│ Node.js runtime         │
│ Production dependencies │
│ Production app          │
└─────────────────────────┘
We are not carrying the entire workshop into production.
We only carry what the application needs to run.
If you want to know about essentials tools of devops you can find it here...
Why Smaller Docker Images Matter
You might be thinking:
"Okay, but why should I care if my image is smaller?"
There are several practical reasons.
1. Faster Image Pulls
Before a container starts on a server, the server may need to download the image.
A smaller image means less data to download.
For example:
1 GB image
    ↓
More data to download

400 MB image
    ↓
Less data to download
This can be especially useful when deploying frequently or working with multiple servers.
2. Faster Deployments
Imagine you deploy your application several times a day.
Every deployment may involve pulling a new image.
Reducing the image size can reduce the amount of data that needs to move through your deployment pipeline.
That can help make deployments faster.
3. Less to Maintain
A production image with fewer unnecessary packages and tools is simpler.
If something isn't needed at runtime, there is often little reason to ship it there.
This can also reduce the number of components you need to think about when maintaining your production environment.
Another Quick Question
Imagine your production application only needs:
Node.js
Production dependencies
dist/
Do you need:
TypeScript compiler
Source code
Development dependencies
Build tools
to start the already-built application?
No.
And that's exactly what we are trying to achieve with a multi-stage build.
One Important Detail: .dockerignore
There is another improvement you should make.
Create a .dockerignore file:
node_modules
dist
.git
.env
npm-debug.log
Dockerfile*
Why?
Because when you run:
COPY . .Docker sends files from your build context.
You don't want unnecessary files such as your local node_modules or .git directory being included.
A .dockerignore file tells Docker:
Don't send these files as part of the build context.
For example:
node_modules
.git
dist
are usually good candidates to exclude.
If you want to learn essential skill before Docker and Kubernetes follow this article
Before vs After
Let's summarize the difference.
Before
Source code
     +
Build tools
     +
Dev dependencies
     +
Runtime
     +
Production app
     ↓
Large image
After
BUILD STAGE
Source code
Build tools
Dev dependencies
     ↓
Production files
     ↓
FINAL IMAGE

Runtime
Production dependencies
Production app
The build environment does its job and stays behind.
The production image gets the finished application.
Final Dockerfile
Here is the complete multi-stage Dockerfile again:
# Build stage
FROM node:22 AS build

WORKDIR /app

COPY package*.json ./

RUN npm install

COPY . .

RUN npm run build


# Production stage
FROM node:22-alpine

WORKDIR /app

COPY package*.json ./

RUN npm install --omit=dev

COPY --from=build /app/dist ./dist

CMD ["node", "dist/index.js"]
If you're new to Docker, don't worry if this looks unfamiliar at first.
The most important line to understand is:
COPY --from=build /app/dist ./distIt means:
Take the finished application from the build stage and put it into the clean production stage.
That's the trick.